The most productive month of my sewing life

At the beginning of the year, I decided that I would sit less in front of the computer (despite the fact that I said I would write at least a weekly blog post) and more in front of my sewing machine. For some reasons, while my new year resolutions are usually well forgotten by the second week of the year, this time I stick to it.

It’s January 29 and I managed to sew and FINISH:

– one pair of stretch corduroy jeans. I used a lovely pattern I found in an Italian magazine, La Mia Boutique, from last summer. I traced the pattern in August and let it sit untouched until now. You never know, they might improve with time, like wine LOL

– one pair of Jalie 2908 jeans. The size I used last winter to make my first pair in stretch denim was a bit too big so I figured that using a non stretch denim in the same size would make my jeans perfect. Boy, I was WRONG! They fit almost fine around my bottom, ok at the waist but I can barely bend because they are so tight around my thighs. I went back running and I might have lost a couple inches here and there so who knows, maybe I will be able to wear them in a month or so, otherwise I’ll give them away. I’m planning to make another pair in STRETCH denim soon (soon can mean anything, but you know that, don’t you?)

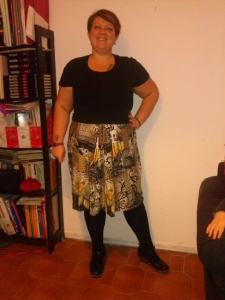
– a t-shirt using the Blank Canvas Tee pattern. I already used this pattern last year to make the April hack t shirt which is lovely, now I wanted something to wear with my jeans and a cardigan, it turned out nice but due to poor fabric recovery the neck band is a bit loose. Ca I live with that? I can! Also because the fabric I used had a series of misfortunes. I love this pattern because it really is a blank canvas, easy to hack, nice and quick to sew as is. I also love the fabric and I got some more I’m using to make a Lady Skater dress.

As you can see my pictures haven’t improved LOL but hopefully you can see that the fit is perfect and the length too.

blankcanvastee

Here’s a close-up of the fabric, I love it so much that I bought some more and I’m making a Lady Skater dress with it.

najoleari

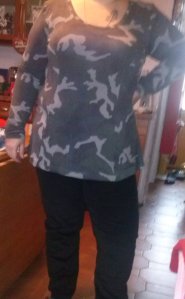
– A Penny Pinafore Tunic. I had not enough fabric to make a dress and honestly I wouldn’t use it any time soon because it’s too cold. I had some camo print viscose jersey which I wanted to use to make a long sleeve t shirt.  I had just enough fabric to make a Penny Pinafore tunic so I decided to give it a try. Let me tell you, I’m in love! The design is lovely and I can’t wait to make a dress, I’m wearing it all the time with my corduroy jeans (also in the picture) and I think it’s really flattering

pennyp

– A Cocoa shrug, using a moss green fleece that I intended to layer over my new Penny tunic. I don’t have a picture of it because even though I chose my usual Cake Patterns size (40 cup D) it turned out to be too small on the front and I can’t close it so next time I’ll go up a size. Even so I love the design and the fact that it’s quick(ish) to stitch and it only requires a yard of fabric or less, depending on size and sleeve length.

I also made a super hero cape and a Spiderman mask for one of my daughter’s little friend who invited her to his party (she was the only girl at the party, my little Tom boy). when we arrived at the party it turned out that the party boy was wearing his Spiderman costume but it came without a mask! For the cape I traced my pattern directly on fabric, I had some blue satin and red cotton, I traced a circle using a plate on red felt and hand draw the boy’s initial on blue felt.
For the mask I used this tutorial from Jessica @ Cutesy Crafts

spiderman


I made an Inset zip pouch by Keyka Lou in black and red (the pattern is now retired) and a 4 pockets skirt bag by Michelle Patterns using the corduroy remnant from my jeans and a red cotton lining. I stitched the last two for a showcase that will happen in February so I can’t show you any picture yet,  I secretly hope I won’t sell the bag (don’t tell hubby though). If I have enough time I would like to add a wallet to the collection.

On my sewing table at the moment there is a Lady Skater dress already cut so hopefully I’ll have this one more dress stitched by the end of January.

For February I already planned to sew a Hummingbird skirt in printed corduroy and a matching Hummingbird top, a Tiramisu dress, a new pair of Jalie jeans in STRETCH denim and a Penny pinafore dress, I also bought the Swoon Scarf Neck Cardigan pattern last week and can’t wait to stitch one, I love this kind of cardigans.

I used to sew more for my daughter than for me but at this time of the year she’s got enough to wear and I won’t have to make anything until March, at least, so I can do some selfish sewing!Sewing mojo, please, don’t die on me 🙂

My 2013 in sewing (and some new year resolutions)

Every time I start a blog, I seem to be unable to write as many posts as I would.
So, since it’s time to make some new year resolution, I’ll have “blogging more” among my top 3.

1. Run more! I used to run, years ago, last summer I decided to try power walking but after a few months I wanted to run again so I started the new year using Rundouble Couch25K app. Yesterday I did Week 1 day 1 which was easy enough for me as I’m not really a couch potato LOL:  5 minutes warm up, 60 sec running 90 sec briskly walking repeated 8 times, then 5 minutes cool down. I’m also signing for a 5k in March, so that I’ve got something to look for and keep me motivated

2. Sew in a more organized way! Honestly, I sew quite a lot but I’m not really organized so I end up having a lot of UFOs; at the moment I’ve got a Kitschy Coo Lady Skater dress ready to be cut, I put together fabric and pattern and notions about one month ago but then decided to make a reindeer, and a bag, and 3 pouches and a doll and a few infinity scarves until I realized (like… now!) that in less than one week I’ll go back to work and I’ve only one pair of wearable trousers left. No way I’m wearing dresses in the freezing northern Italy winter climate. Lady Skater will have to wait! Today I’ll start with cutting two Jalie jeans 2908. I’m using a stretch denim in blue and a stretch corduroy in black. I’ve already used this pattern and the result was pretty good, I just needed some minor adjustments

3. Blog more! I really want to blog about my sewing achievements, to keep track of what I do, share pattern reviews and pictures. Ehm… pictures. I’m a terrible photographer so even though I sew a lot, I never want to blog about it because my pictures are so ugly. So I’m going to put more effort in learning how to take better pictures and try to blog more. Let’s say, at leas twice a month. Promise!

For now, anyway, even though my pictures are really terrible, I still want to post  some of the things I made during 2013. Here you go….

First of all I managed to participate in the Red Velvet Sewalong; I was in the Esme house and we won! It was really exciting to sew together with so many lovely ladies and I decided to buy the Hummingbird top and skirt with the voucher I won. I made a Hummingbird top already, it was a muslin but it’s so lovely so I’m making another one soon and show it!

This is my Red Velvet dress muslin, if it wasn’t for the sewalong I’d dumped it because it looked horrible at first but with the lovely ladies help I managed to make something wearable.

vestitofinito

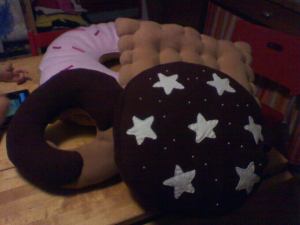
Some biscuit and doughnut cushions I made to order a few months ago. I’ve wanted to make a couple for our couch ever since but I can’t seem to have the time. I used a self drafted pattern.

216000_10200371534872618_1208743994_n

601617_10200650145797717_952614156_n


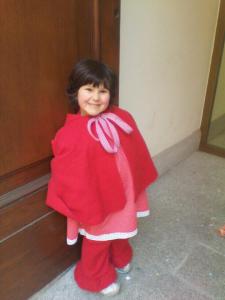
Little red riding hood costume for Carnival, chosen by my daughter. To make this costume I used some red fleece for the cape (free pattern from Fleecefun) and for the pants (Easy fit pants by Scientific Seamstress). The dress is the aglan shift dress by Whole Grain Baby, I had a negative experience with them as I had to file a claim with Paypal to get my patterns and many people had the same experience or didn’t receive anything at all after paying so I wouldn’t suggest it, but the dress is cute nonetheless and after Carnival my daughter used it a lot

541395_10200515058660623_531395036_n


A doll I made for a lovely little girl whose name is Eva.  I used the Schoolgirl doll pattern by Dolls and Daydreams.

CAM00430


CAM00432

The beautiful Red Velvet Clutch by Cake Patterns.

I used some Dr Who themed fabric I got from Spoonflower

CAM00773 CAM00772 CAM00770

Infinity scarf made for my daughter, she loves it so much that she asked me to make two more for her friends, I used a tutorial found online ages ago but I can’t remember which one, sorry!

CAM00788  CAM00783 CAM00776

A reindeer I made as Christmas decoration; I’ve got a cute reindeer I bought when I lived in Dublin and we always put it on the windowsill at Christmas so I made her a companion 🙂 I used a Funky Friends Factory pattern, I love Pauline’s patterns, the end result is always so professional!

CAM00803 CAM00797

A “look alike” doll I made to order; this is for a 21 years old girl, from her mom, I love making it, using a Dolls and Daydreams pattern, the Rainbow Baby Doll.  I designed her hair, jumper, pants and boots and painted her face with pencils, isn’t she lovely? 🙂

minimeLast but not least, my favourite handbag ever. I made this using a pattern from Lisa Lam, the Hot piping hobo bag, which can be found in her first book “The bag making bible”. If you don’t have this book, you really should buy it, I learnt so much from it. The fabric is a Dr Who themed one I also got from Spoonflower, unfortunately is not available anymore, I bought one meter only and I wish I had more.

drwhobag


HAPPY NEW YEAR!

Farbenmix Karla coat and Kids clothes week

Yesterday in the afternoon I managed to finish a Farbenmix Karla balloon coat for my daughter.

It was the first time I sewed something from a Farbenmix pattern and I totally loved it, it is well drafted and I love the design.

Since my cheeky monkey is a bit on the chubby side and she’s very tall for her age, I decided to go up a size but I might have used her actual size because the jacket is really generous, the length is almost perfect though  as this is supposed to be a knee-length coat. I took pictures from above her head but it hits just a little below her knee.

Since it took me some time to stitch this coat, I’m happy it is so generous because I hope my cheeky monkey will wear it for a couple of winters at least.

The pattern is not for complete beginners but it’s not too difficult either. I would say it is a bit time consuming, especially if you opt for adding ribbons and appliqué as I did and it is a bit challenging, but if you love challenges and this is not the first time you sew clothes, than go for it!

I used some waterproof resin coated cotton for the shell, I bought it form an Italian online store  at a bargain price. It was a little difficult to gather but otherwise lovely to sew.

Image

For lining I used a double sided fleece I got from here, it is really warm and cuddly and my daughter loves it. Ribbons also come from the same shop.

Image

My daughter requested an owl appliqué, I drafted the owl and used some light brown minky for the body, brown fleece for wings, wool blend felt for beak and eyes which I then embroidered. I bought some really nice ribbon from Seamstar last year and I still had some left, so I decided to use it to add a cute ribbon on the owl ear.

Image

The coat comes with its own hood which is ready but I ran out of buttons so I’ll have to wait until market day to get them.

Taking pictures of my little model is not that easy, she can’t stand still and she’s always making faces. Today she was grumpy because I told her a lie (or what she thought was a lie, really) but I decided to add this picture because it makes me laugh LOL

CAM00690

When I ordered fleece for the coat, I ordered some lovely cotton jersey too and two meters of cotton nicky velour in red and fuchsia because there is free shipping for orders over 95 Euro. I’m supposed to make leggings and dresses and a couple of hoodies with all that fabric but lately I feel like my days are shorter than usual and the Karla coat took me *forever* to finish.

Luckily EvieJ posted something earlier today over at Pendle stitches and I discovered that this is the Kids Clothes week.

Well, this is just what I needed to get started (ahem, no, I need much more but I need a reason not to find more excuses LOL)

She needs some new leggings, I used the Go to Leggings before and I like them enough to use the pattern again, even though I’m waiting for Steph to release Cake patterns girl leggings.

Then I’ve got my TNT dress pattern, it is the Go To Signature Dress. I made at least 10 dresses from this pattern so far and they are all different and lovely so I’m using it again, until the above mentioned Steph releases her kid collection! 🙂

I bought the Ananda pants pattern by Chopstix lately and I haven’t tried it yet so this might be the right occasion to try it.

Let’s see if I can have my cheeky monkey wardrobe ready but the end of the Kids clothes week!

A wave of light

I put my candle on my kitchen window, I looked at it while I was preparing dinner, I couldn’t help crying.

On June 17 my husband and I went to the ER, I was bleeding and I knew what was happening. My husband was confident that everything would be ok, I had some bleeding when I was pregnant with my daughter so he assumed it would be the same. I knew it was different, I just knew.

That very night I miscarried.

I never felt so alone in my whole life, everybody was trying to cheer me up, saying that it was for the better or that I should try for another baby immediately or that it wasn’t even a baby yet.

It was. HE was, he was MY baby. And all I wanted was to cry and talk about him, I needed sympathy, not words.

Finally I met a mom who had two miscarriages and that day we talked and talked and talked about our babies, those babies who are our children but we will never hold, cuddle, feed.  And I felt relieved, relieved that I could talk about him and that somebody could understand how I felt. Today I lighted a candle for my baby. It’s on the kitchen window.

On Thursday October 17, exactly four months later, we are starting a course to become foster parents.

I don’t know if there will be another baby in my life, a sibling for my sweet little girl. But I know that we are a family, a beautiful family, and we have each other and we have so much to give. I don’t know if I will be a mom again but this house will see many many children for years to come, that’s for sure.

If you want to know more about the Baby Loss awareness, you can go here.

“October 15th is Pregnancy and Infant Loss Remembrance Day across the world. We would like to invite you to take part in the global ‘Wave of Light’. Simply light a candle at 7pm and leave it burning for at least 1 hour to join us in remembering all babies that have died during pregnancy, at, during or after birth.
This can be done individually or in a group, at home or in a communal space. Wherever you do this, you will be joining a global wave of light in memory of all the babies who lit up our lives for such a short time.”
 

Red Velvet sewalong, I’m in the Esme house!

I just entered the Red Velvet sewalong at Cake Pattern’s, yay!!

I might be a little too excited, I know, but this is the first time I participate in a Sewalongand I’m really really happy! 🙂

I bought the Red Velvet collection in PDF format and to join the sewalong I entered my email address and the Etsy transaction number here as a “.pdffer”

The sewalong will start on November, 11 and finish on November 25.

After seeing this dress made by EvieJ I decided that I want a ponte knit dress too, I really like the end result. I’d love to make one in purple but I just realized that I haven’t any LBD, so this might be the perfect occasion to stitch one!

I already have some fabric to make a Red Velvet dress and I meant to sew it over the past few days, but the weather has changed a lot since last week, it was still summer and all of a sudden I had to take out the duvet (I’m longing for a duvet day now but as a mom, that would happen only if I was ill… VERY ill).  So I realized that I needed a coat more than a dress. I’ll show you, I promise, I have to hem it first but is almost ready and can’t wait to wear it.

After that I’ll try to sew a RV but my sewing list is so long that I might not be able to make one for a while, especially because my daughter need to be served first!

That’s all for today, let me know in which house you are, I can’t wait to find out who’s in my team! 🙂

Fancy an Espresso?

Sewing patterns with a vintage feel yet practical AND in a wider size range? Please, meet StephC! She blogs over at 3hourspast and is the creative mind behind Cake Patterns.

Her first pattern, Tiramisu Dress was also the first one I bought and stitched. I bought the PDF pattern to save a little but I heard tell that her printed patterns are absolutely gorgeous.

After stitching my first Tira (that I haven’t properly modeled yet, even because I dropped a size or so since then) I decided she’s my favourite designer ever (plus, Tiramisu in my favorite dessert so the name might have influenced me just a tiny bit LOL)

Image

Cake patterns are smart, well drafted patterns for knit fabrics, designed to fit most women, she also offers a great service through her blog with loads of tips and tricks and sewalong. Just pay her a visit and you’ll see!

On September 26 StephC launched her latest collection (I admit I was kind of stalking her, checking every day if the collection was out yet :D), The Red Velvet collection which will be available at a special price for a limited time only. Of course you can buy single patterns but I love all patterns in the collection so I got them all: Espresso, Red Velvet dress and Red Velvet clutch are instant downloads, Cocoa and Carmine will be available mid October (I can’t wait!!)

A PDF pattern is a file you download and print at home, then you have to tape it (let me tell ya, it’s a pita but totally worth it!) and it’s ready to be used!

This time Steph included a cute printable envelope in the PDFs, which is lovely because one of the problems with PDFs is where to store the pattern once is printed. Problem solved!

I already taped my Red Velvet Dress and Espresso Leggings and I started stitching the leggings because I had some cotton spandex black knit ready for this project (and the only RTW leggings I own(ed) had holes between my thighs… I dumped them as soon as I finished sewing Espresso!)

The whole Espresso experience it was great fun. The pattern, once taped, look like this

Image

Cool, isn’t it? You fill the dots with your own measurements and then connect them and VOILA’, you have your custom fit leggings pattern. Told you she’s clever!

The pattern is in inches but it’s quite easy to convert it in centimeters (I’ve got a double measuring tape with both cm and inches but if you google “inches in cm” you just need to insert the number you need to convert and google will do it for you). After cutting the fabric, stitching up the leggings was a breeze. I used my own method, stitching both front and back rise first and the stitching the inseam from ankle to ankle. I used an overcast stitch on my sewing machine and a walking foot (and I’m not the only one who did this :)) which I find very useful when sewing with knits- I like the overcast stitch because I stitch and finish the edges at the same time, plus I’ve got 2 rows of stitches to secure my seams.

I used a 2 cm black elastic for the waistband, I fold the seam and stitched it using a honeycomb stitch, for its elasticity and because I think it looks nice.

I haven’t hemmed my leggings yet because I want to check how the fabric behave after another washing or two. Sometimes cotton knit shrinks a little after the first washing.

I might tweak the pattern a little to get a snugger fit around my knee and ankle, I decided to round up the measurements because it’s easier to take in the seams if needed than the other way round.But I LOVE these leggings and I’m definitely making many more! For once I have pants with a waistband which sits at my navel, where I want it to be, insted of under my boobs (since I started sewing my own clothes I’ve discovered that I’m short waisted, so I now know why all RTW bottoms look like this on me LOL)

Image

I will try to have some pictures taken, I promise (maybe with my RV Dress) but you have to trust me, you’ll love stitching this leggings!

In the next post…. my first attempt at the Red Velvet dress!

__________________________________________________

Cartamodelli che uniscano praticità e vintage look, in una grande varietà di taglie? Vi presento StephC! Il suo blog si trova qui 3hourspast.com e Cake Patterns e il nome della sua linea di cartamodelli!

Il primo vestito che ho cucito è Tiramisu, un abito anni ’50 in versione moderna, cucito con kersey di cotone bielastico. Dopo aver provato Tiramisu ho decretato che Steph è la mia designer preferita!

Alcuni giorni fa è uscita la sua nuova collezione di cartamodelli, la Red Velvet. E’ possibile comprarli come modelli singoli oppure l’intera collezione ad un prezzo scontato, ma solo per pochi giorni ancora, fino a che non uscirà la versione stampata.

Io ho comprato la collezione intera in PDF, per ora sono usciti l’abito Red Velvet, i leggings Espresso e la borsa RV.

Ho iniziato cucendo un paio di leggings, visto che gli unici che possedevo erano ormai bucati e sono stati gettati non appena ho finito di cucire questo nuovi!

Il cartamodello è disegnato da noi, utilizzando il template stampato. E’ facilissimo, basta misurarsi come da istruzioni, riempire i “puntini” e connetterli tra loro per ottenere il proprio cartamodello personalizzato!

Ho utilizzato un jersey bielastico nero in cotone e lycra, acquistato qui, servizio ottimo!

Ho cucito utilizzando un punto coverlock sulla mia macchina da cucire, molto robusto ed elastico, condizione essenziale quando si cuce con maglina e jersey. E ho usato il piedino a doppio trasporto, anche questo utilissimo soprattutto con tessuti elastici o scivolosi o… sempre 😀

Devo ancora orlare i miei leggings, lo farò dopo averli lavati un paio di volte perchè il jersey tende a stringersi ancora un pochino nei primi due lavaggi successivi al primo.

I prossimi li stringerò un pochino su ginocchio e caviglia, ho preferito tenerli leggermente più larghi visto che è più facile stringere che allargare.

A parte questo, sono perfetti e finalmente ho dei pantaloni il cui cinturino sta sul mio ombelico, dove io voglio che stia e non appena sotto le tette! Da quando ho iniziato a cucire i miei vestiti ho scoperto di avere la vita alta e questo finalmente spiega perchè qualunque pantalone io provi in negozio mi fa apparire un po’ fantozziana…. la famosa vita alta, eredità della mia prozia paterna (già che c’era poteva passarmi anche i suoi magnifici occhi azzurri, no? 🙂

Prometto che se l’homo collabora metterò delle foto.

Al prossimo post, in cui parlerò del vestito Red Velvet e della mia prima prova con questo cartamodello.